|
|
|
This guide will show you how to export your video to the MPEG-4 format using 3ivx and QuickTime Pro.
QuickTime Pro is the Swiss Army knife of multimedia editing. It provides enhanced playback, simple editing, basic effects and import/export of many types of media.
Before starting make sure that you have a suitable source. You can use any source file you want, as long as it contains video and properly plays back in QuickTime.
|
|
|
|
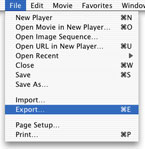
Step 1 - Exporting
Choose 'Export...' from the file menu.
|
|
|
Step 2 - Select the Destination
Type in a name for the video clip you are going to create and select the location where you would like to save it. Select 'Movie to QuickTime Movie' from the Export popup menu, then choose 'Options...'.
|
|
|
Step 3 - Video Settings
Click 'Settings...' in the Video Section of the dialog box.
|
 |
|
Step 4 - Configure the Video Encoder
Then from the Compressor popup menu, Choose '3ivx D4 4.5.1', click 'Options...' and configure the codec.
More information on the configuration of the various modes is available here.
If you are not using 'Constant Quality' mode, make sure to enter the data-rate in the Compression Settings dialog. (Bitrate Calculator)
Step 5 - Configure the Audio Encoder
Click 'OK' twice and configure the Audio Settings if appropriate. We recommend the use of MPEG-4 AAC Audio.
Step 6 - Start the Encoding
Click 'OK' and 'Save' to start encoding
|